
Today I am sharing with you an easy handmade Christmas gift idea that you can make with SCRAPS! Yay! Scrap busting ideas are always welcome to me! Hopefully they are for you too! And since you can use scraps, you could sew up a few of these in time for Christmas. (You could change up the batting if you don’t have it on hand).
This is sort of a simplified tutorial (my first ever!) I’ll describe how I made these in a few short steps but no photos of the process.
But first: The fabric! The main fabric I used for these ornaments was one of my own designs: Checkered Christmas, in both the Merry (top) and Festive (bottom) colorways.

I originally purchased this fabric for another Christmas gift project which you can read about in this POST. The fabric type was Spoonflower’s Lightweight Cotton Twill (but you could used any woven type of fabric you’d like). I paired it with some Forest Green Canvas in my stash. I cut the main fabric at an angle to add a little visual interest and fused it with a layer of batting to give it some extra thickness. The ribbon for the loops was also in my stash. You could also use embroidery thread, yarn, or even a tiny loop of thread for an ornament hook to attach.

HOW TO:
Before diving in I want to say that these instructions are for a medium weight fabric like the Canvas Twill. If you choose something lighter, like quilting cotton, you may want to interface pieces, add fusible batting to the trunk, or even have the batting on both pieces of the triangle. You want to make sure there is a enough stability that they can hang nicely.
Step 1: For each ornament CUT: (2) Tree Top Triangles, (2) Tree Trunk Rectangles, and (1) Fusible batting triangle approx 3/8″ smaller all around than the tree triangle. (See Diagram at the end of post for dimensions).
Step 2: Fuse 1 side only of the tree top triangle with the batting. (You could skip this step or interface with non-batting instead.)
Step 3: Sew tree trunk rectangles right sides together on 3 sides with a 1/4″ SA, leaving the top unsewn. Clip corners, turn right side out and press well.
Step 4: Sew tree top triangles right sides together with a 1/4″ SA, leaving an opening in the bottom center slightly wider than the finished outside dimensions of the tree trunk rectangle. Clip corners, turn right side out and press well.
Step 5: Insert the trunk into the bottom of the tree, unsewn side up approx. 1/4″ Secure with a pin, washable tape etc.
Step 6: Add top attachment piece of your choosing. For my trees I secured the ribbon loops to the top of the trees with a few hand sewn loops of thread. I THINK I did this before sewing the tree opening closed so I could hide the knotted ends INSIDE the tree.
Step 7: Top-stitch around entire tree outline with a 1/8″ SA (which will attach the trunk to the tree top).
And Voila! Your simple ornament is finished! Repeat steps 1-7 for as many as you’d like. As you can see below I made A LOT of these!

I hope this tutorial was helpful. If a step is unclear please let me know so I can clarify!
CUTTING DIAGRAM:
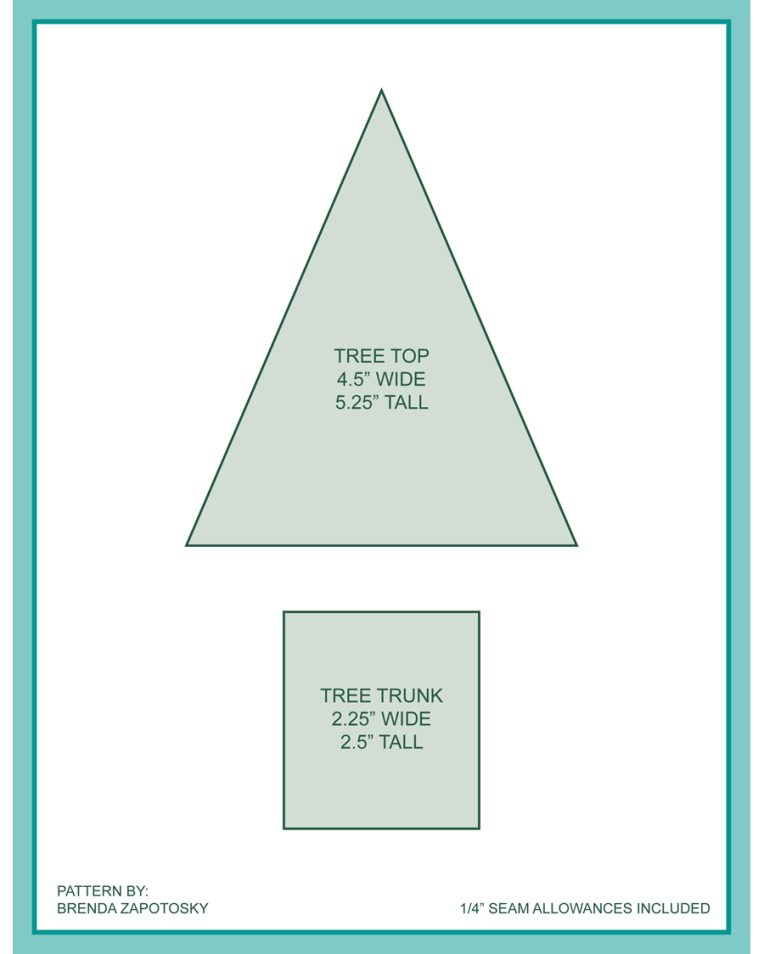
These are the approximate dimensions for my trees. I made these for Christmas 2018 and the trunk might have been sized slightly differently. I had hoped to have a pdf download of the “pattern” as part of this post. (and may add it in the future). For now, if you would like a printable copy of the pieces let me know and I can send them too you.
Thanks for much for reading! If you make this and share online please be sure to tag me so I can see your creation! On Instagram: @brendazapotosky
Merry Christmas!
Brenda