Today I am sharing some basic steps to go along with the cut and sew ornament fat quarter design I have in my Spoonflower shop. While this post is intended to be a simple instruction set for anyone who purchases my design this process can really be applied to any sewn ornament you might want to make! (Simply cut some hexagons from some fabric in your stash and follow the steps!).
NOTE: The design you can purchase is only for FABRIC all additional materials you will need to obtain separately. This is not a kit.
THE FAT QUARTER
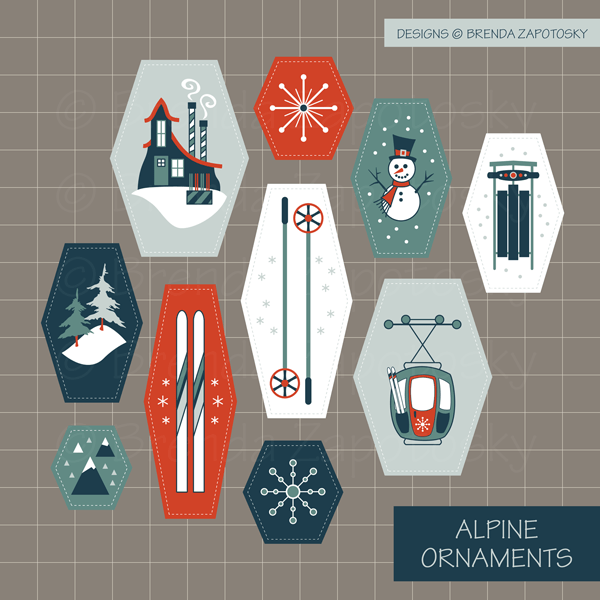
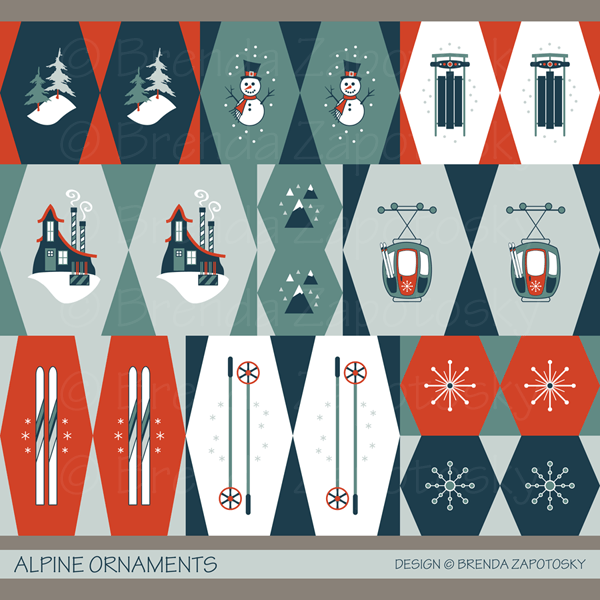
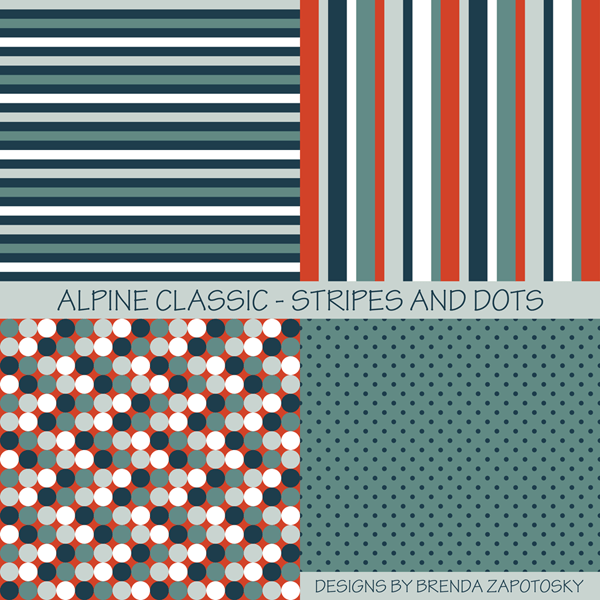
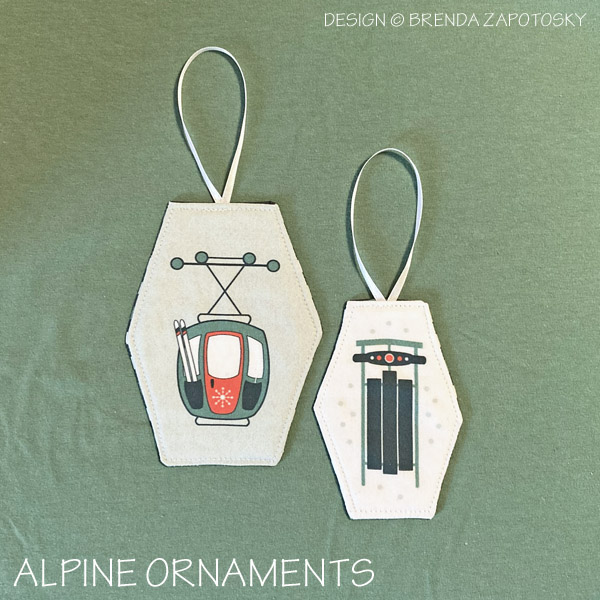
Here is a look at the design: ALPINE ORNAMENTS CUT AND SEW in the Classic colorway. The design is 21″ wide which will work on ALL fabric types, including Petal Cotton. If you purchase a wider fabric you may get a few extra ornaments from your cut! There are duplicates of every design giving you two options. You can buy just this fat quarter and make 10 two-sided ornaments OR you can pair this fat quarter with an additional fabric and get 20 ornaments. I have many coordinating patterns in my Alpine Classic Collection or you can use something from elsewhere. I used the STRIPE on the top left of the image below to back mine.
ADDITIONAL MATERIALS
OPTIONAL: 1/8″ Fusible Batting/Fleece: This will give your ornaments some structure and depth. You need enough to apply to ONE side of the ornaments. If you choose a heavier fabric you could skip it but with one of the quilting cottons you will want it.
Ribbon: I made my hanging loops with 1/8″ satin ribbon you can buy by the spool from a craft store. The instructions will be based on this ribbon. You could choose a different size ribbon or even something more decorative or even do a short loop of thick thread and use a hook to hang them instead.
PREPARATIONS
Pre-wash your fabric.
Cut out all the hexagons from the fat quarter. If you are backing with coordinating fabric use those hexagons as your pattern pieces for the backings.
Cut 1 fusible fleece hexagon for each ornament 3/8″+ smaller on every side.
Fuse the fleece to each front piece of your ornament.
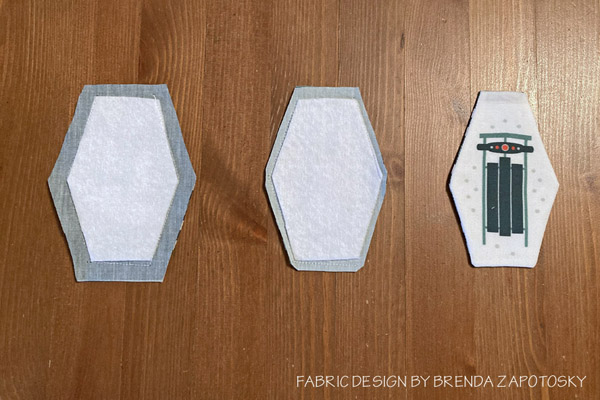
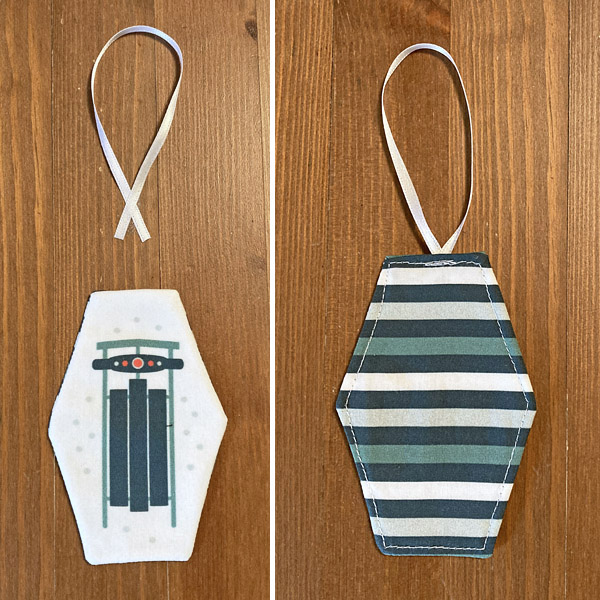
LEFT to RIGHT: Right sides sewn together leaving the top open. Trimmed seam allowances. Ornament turned right side out and pressed.
SEWING THE ORNAMENTS TOGETHER
For each ornament take one front piece fused with fleece and one backing and sew right sides together with a 3/8″ SA around 5 sides leaving the TOP side of the hexagon unsewn.
Trim those same 5 seams down to 1/8″. DO NOT trim the top. Clip corner points a little extra.
Turn your ornament right side out pushing out corners and sides to get a crisp shape. Press well.
Turn in the top edges 3/8″ and press seam
BEFORE and AFTER adding the ribbon. Right photo shows the coordinating fabric I used which is sold separately.
ADD RIBBON LOOP AND FINISH
Cut a 8″ length of ribbon for each ornament.
Turn the ribbon into a loop with the ends overlapping approximately 1/2″
Insert the overlapped portion into the top of the ornament opening until the overlap is concealed. Be sure that your loop is centered and secure in place. I work one ornament at a time and hold it in place with my fingers and move it over to the machine to sew immediately.
Top stitch around the entire outline of the ornament starting and stopping on the top center where the ribbon is. This step will close the top opening, secure the loop and create a nice finished edge for your ornament!
DONE
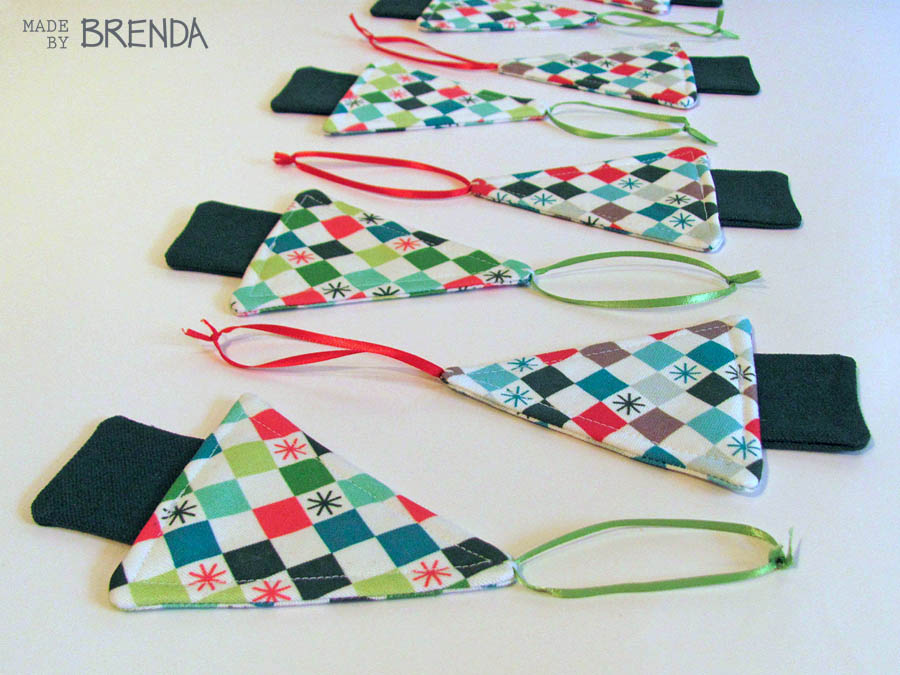
That’s it! Your ornaments are complete! You can hang them as decorations or use them in another fun way! Here is a look at few that I completed.
ADDITIONAL “HELPS” and “HINTS”
Having made these ornaments many times I like to sew each step for all the ornaments until I get to the loop insertion. At that point I like to do one ornament at a time so that I don’t have to have them all held in place.
If you choose an alternate fabric to back the ornaments and are using the minimum fat quarter size you need I highly recommend first cutting the three horizontal strips (The ornaments are in three rows, each row is a different height). Next lay out ALL the ornaments for each strip and mark your cutting lines to ensure you don’t accidentally cut a little too wide and run out of fabric.
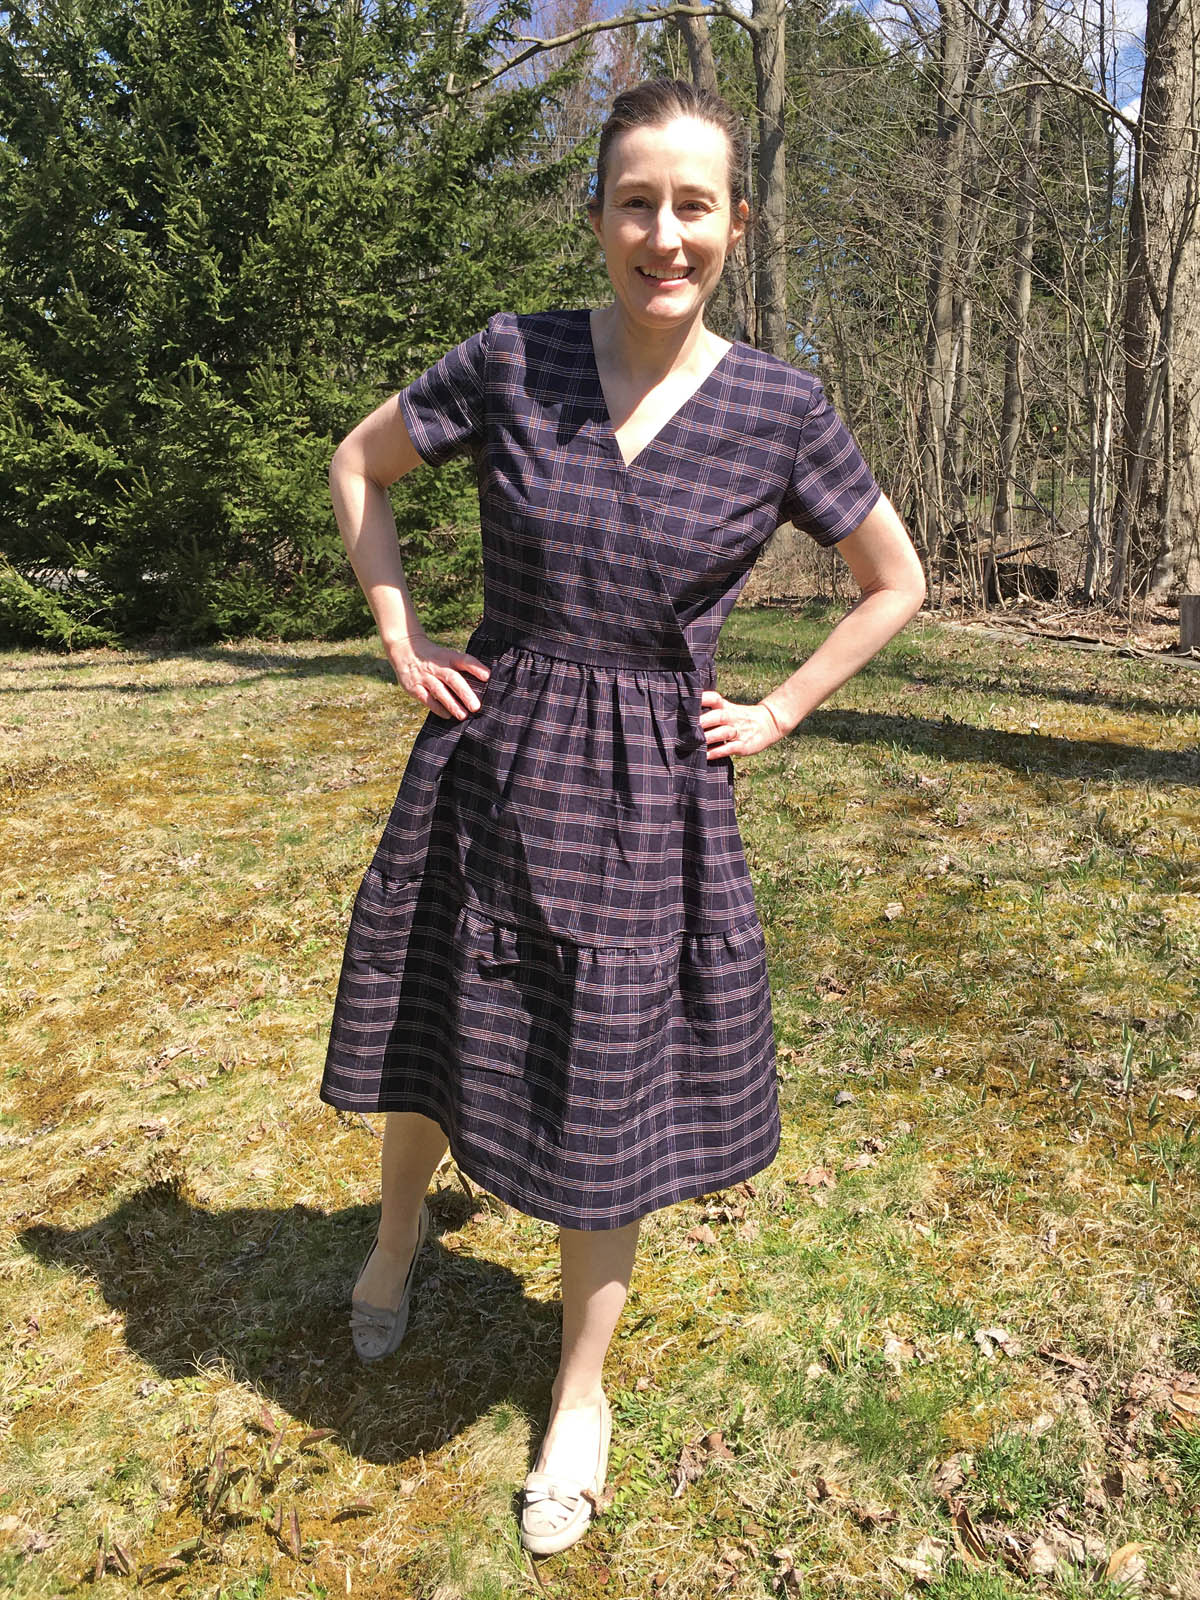
I am here to share that I have another guest blogger post up on the Cali Fabrics blog! This time I am sharing a plaid Madrid Dress by Coffee and Thread! I’d love for you to check it out: Boho and Preppy Meet
Hey All! I have a fun sewing project to share with you today… On ANOTHER blog! I am excited to announce that my first Guest Blog post for Cali Fabrics is up on their blog today! I am sharing a Morris Blazer I made out of some awesome stretch denim. A “Not a Jean Jacket” Jean Jacket! I’d love for you to head over to the Cali Fabrics Blog to read all about it!
I am bringing you a new kind of post today… a bit more reflective than my usual posts. But before I dive into sentimentality let me begin with a bit of background about this art piece I am sharing today.
Last November I joined Bonnie Christine’s Flourish Design Tribe. As part of the group we have the option of participating in a monthly challenge each with a new theme. For my illustrations I have decided to focus on a house or other building as the main feature. And I am trying to keep them seasonal as well (with the thought of maybe making a calendar with them when I am done).
I actually drew my first house for December 2019. And for January, I used row houses to illustrate my word for the year: Knock. Here is a little look at those illustrations:
You can read more about each of them on their Instagram posts: December and January
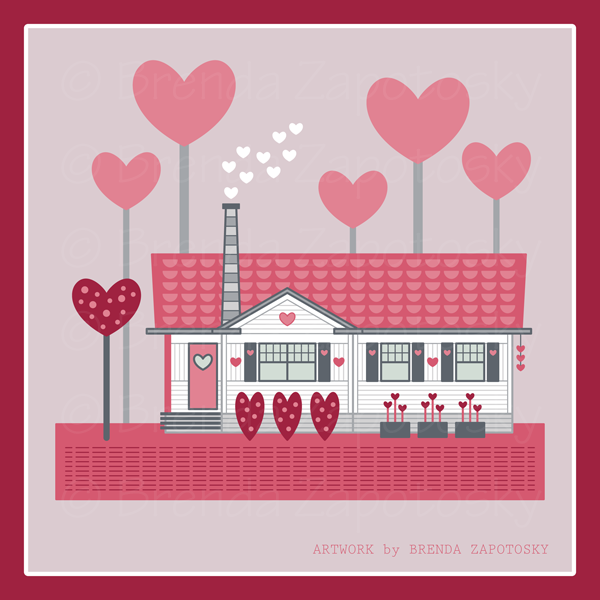
For February our theme was: A Favorite Memory. I found it hard to narrow down to a specific favorite memory (and still fit my architecture criteria), so instead I decided to focus on SOME great memories. The theme of house/building was not too constraining this time since I can think of many fond memories from many, many buildings past and present. I settled on my Grandparent’s house from my childhood because it held many great memories AND was great style inspiration for the Valentine’s themed house I knew I wanted to create. I shared a brief description of the illustration on Instagram (and elsewhere). But I wanted to expand on that here. So first, here is my official description:
In keeping with my running theme of buildings/houses that are seasonal for each month, I chose to do a Valentine themed rendition of a home inspired by my paternal grandparent’s house which held a lot of fond memories for me. While there are several houses I could have chosen, I thought the base look of this one fit a “heart” cottage theme well. This is a great blend of my architecture and illustration selves with the high detailing of the house mixed with the playful whimsy of the Valentine elements.
This is a great succinct explanation but it fails to capture the nostalgia connected to this image for me. The memories themselves. I could share the usual stories of holidays and sleepovers etc. But I think what is uniquely fun about this house is the CRAFTING memories it holds. My grandparents, for lack of better description, were crafters! Multi-talented. And going to their house often meant that we would get to create something! Either with one of my grandparents or on our own just using their VAST “stash” of supplies…. usually scraps left over from one of their projects.
My grandfather was a carpenter. Half the basement was dedicated to his wood working shop and his amazing tools! I learned to use a band saw in that basement. I crafted (with assistance) a working marionette for a school project. There were always little wood scraps galore that could be re-purposed. And my grandfather’s ingenuity was as skilled as his hands!
My grandmother (granny) was the one I spent more time crafting with however. She was crafty on so many levels! Painting… Gardening (and flower arranging)… etc etc Most especially, she was a master seamstress! And so much of my early sewing memories involve her. She had not one but TWO sewing spaces in the house! An upstairs sewing room and extra room in the basement (which could be closed off from the sawdust of grandpa’s wood working). That room has PILES and PILES of fabric! Not so lovely as the Instagram worthy “stashes” of today… but then again, Instagram was not around back then.
She could sew it all: Clothing, costumes, home decor of all kinds, toys, you name it! I had quite a few doll clothes I requested that she make. She could also knit, crochet, hand embroider… I think you get the picture. I mostly watched. As she sewed up the creations I requested and “designed”. But she taught me to sew too. And crochet. And then after college I taught myself to knit, finally, which was news I was happy to share with her.
Both my grandparents have passed now. But I have crafting mementos from both of them! From grandpa a wooden pencil holder (the kind that has individual holes for each pencil/pen etc.) that he made me as a gift when I was a kid. From granny, a whole bunch of knitting needles, some handmade items (including a SUPER awesome poodle skirt she made me, complete with a POODLE ON IT), random notions, some fabric… probably more.
As I have become an avid seamstress myself. These sewing memories hold extra value to me now. One of the items I made with fabric I got from granny are sewing pattern weights. I love that a memento from her sits on my sewing table and are used all the time! I also made my sister a set of the weights and a little bag to keep them in. Here are hers:
So back to the house illustration. I said at the beginning that one of the reasons I chose this house is that the style fit my vision for the Valentine’s themed house. But given how crafty my grandparents were, I think a re-imagined whimsical design of their house is very fitting! A crafted version of a craft filled house!
As I have mentioned many times in this space, my degrees are actually in Architecture and this illustration is a perfect amalgam of my architecture and illustrator sides! I spent a great deal of time detailing out the architectural features. And had so much fun infusing the house and landscaping with Valentine flair! The end result is an illustration that I love that just so happens to invoke memories when I look at it! Double fun!
I was going to end with a photo of my grandparents but I can’t immediately find a digital one where my grandma has a nice smile. And I can hear her voice in my head… she wouldn’t want the photo I did find attached to this post. 🙂 Ah memories….
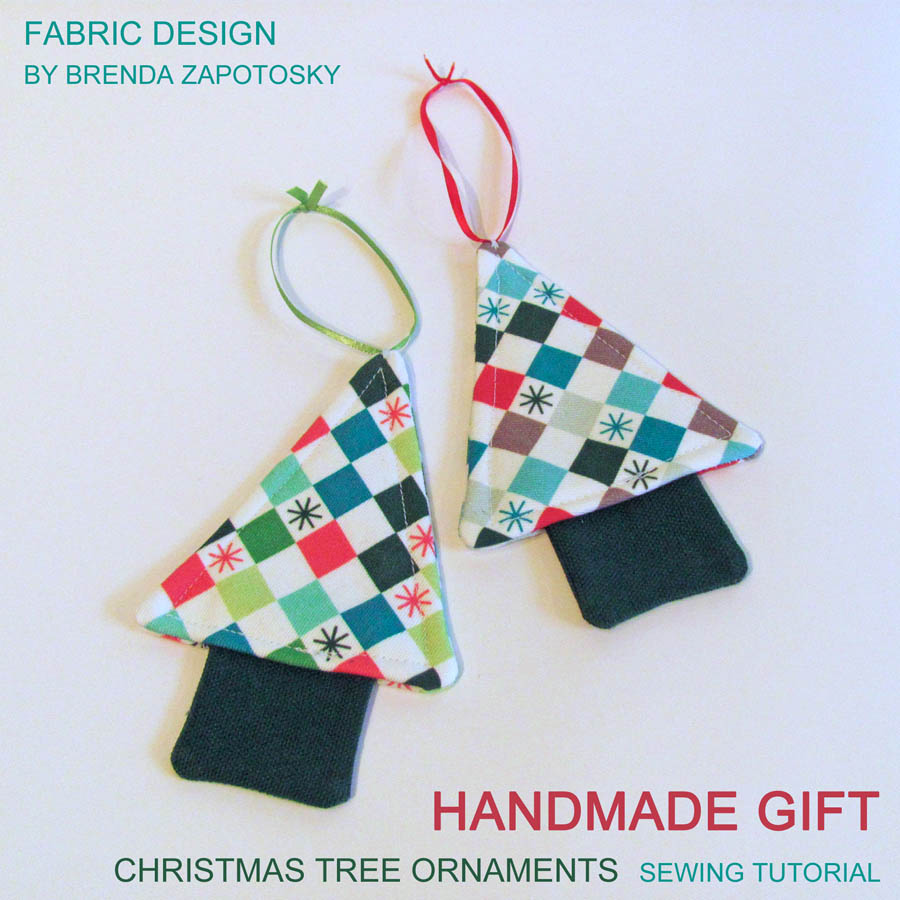
Today I am sharing with you an easy handmade Christmas gift idea that you can make with SCRAPS! Yay! Scrap busting ideas are always welcome to me! Hopefully they are for you too! And since you can use scraps, you could sew up a few of these in time for Christmas. (You could change up the batting if you don’t have it on hand).
This is sort of a simplified tutorial (my first ever!) I’ll describe how I made these in a few short steps but no photos of the process.
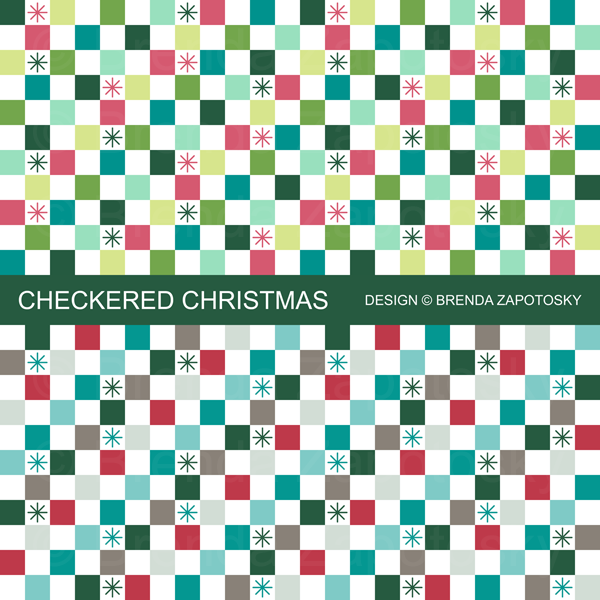
But first: The fabric! The main fabric I used for these ornaments was one of my own designs: Checkered Christmas, in both the Merry (top) and Festive (bottom) colorways.
I originally purchased this fabric for another Christmas gift project which you can read about in this POST. The fabric type was Spoonflower’s Lightweight Cotton Twill (but you could used any woven type of fabric you’d like). I paired it with some Forest Green Canvas in my stash. I cut the main fabric at an angle to add a little visual interest and fused it with a layer of batting to give it some extra thickness. The ribbon for the loops was also in my stash. You could also use embroidery thread, yarn, or even a tiny loop of thread for an ornament hook to attach.
HOW TO:
Before diving in I want to say that these instructions are for a medium weight fabric like the Canvas Twill. If you choose something lighter, like quilting cotton, you may want to interface pieces, add fusible batting to the trunk, or even have the batting on both pieces of the triangle. You want to make sure there is a enough stability that they can hang nicely.
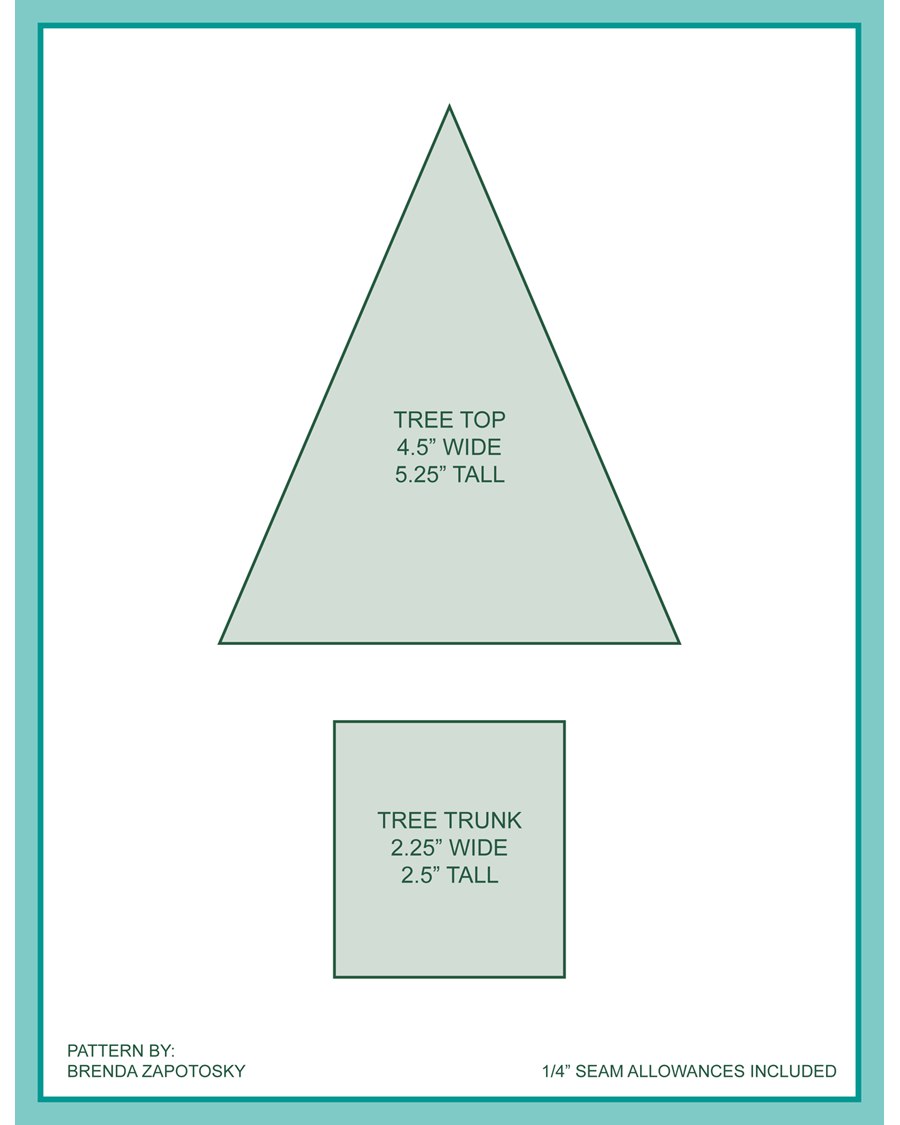
Step 1: For each ornament CUT: (2) Tree Top Triangles, (2) Tree Trunk Rectangles, and (1) Fusible batting triangle approx 3/8″ smaller all around than the tree triangle. (See Diagram at the end of post for dimensions).
Step 2: Fuse 1 side only of the tree top triangle with the batting. (You could skip this step or interface with non-batting instead.)
Step 3: Sew tree trunk rectangles right sides together on 3 sides with a 1/4″ SA, leaving the top unsewn. Clip corners, turn right side out and press well.
Step 4: Sew tree top triangles right sides together with a 1/4″ SA, leaving an opening in the bottom center slightly wider than the finished outside dimensions of the tree trunk rectangle. Clip corners, turn right side out and press well.
Step 5: Insert the trunk into the bottom of the tree, unsewn side up approx. 1/4″ Secure with a pin, washable tape etc.
Step 6: Add top attachment piece of your choosing. For my trees I secured the ribbon loops to the top of the trees with a few hand sewn loops of thread. I THINK I did this before sewing the tree opening closed so I could hide the knotted ends INSIDE the tree.
Step 7: Top-stitch around entire tree outline with a 1/8″ SA (which will attach the trunk to the tree top).
And Voila! Your simple ornament is finished! Repeat steps 1-7 for as many as you’d like. As you can see below I made A LOT of these!
I hope this tutorial was helpful. If a step is unclear please let me know so I can clarify!
CUTTING DIAGRAM:
These are the approximate dimensions for my trees. I made these for Christmas 2018 and the trunk might have been sized slightly differently. I had hoped to have a pdf download of the “pattern” as part of this post. (and may add it in the future). For now, if you would like a printable copy of the pieces let me know and I can send them too you.
Thanks for much for reading! If you make this and share online please be sure to tag me so I can see your creation! On Instagram: @brendazapotosky
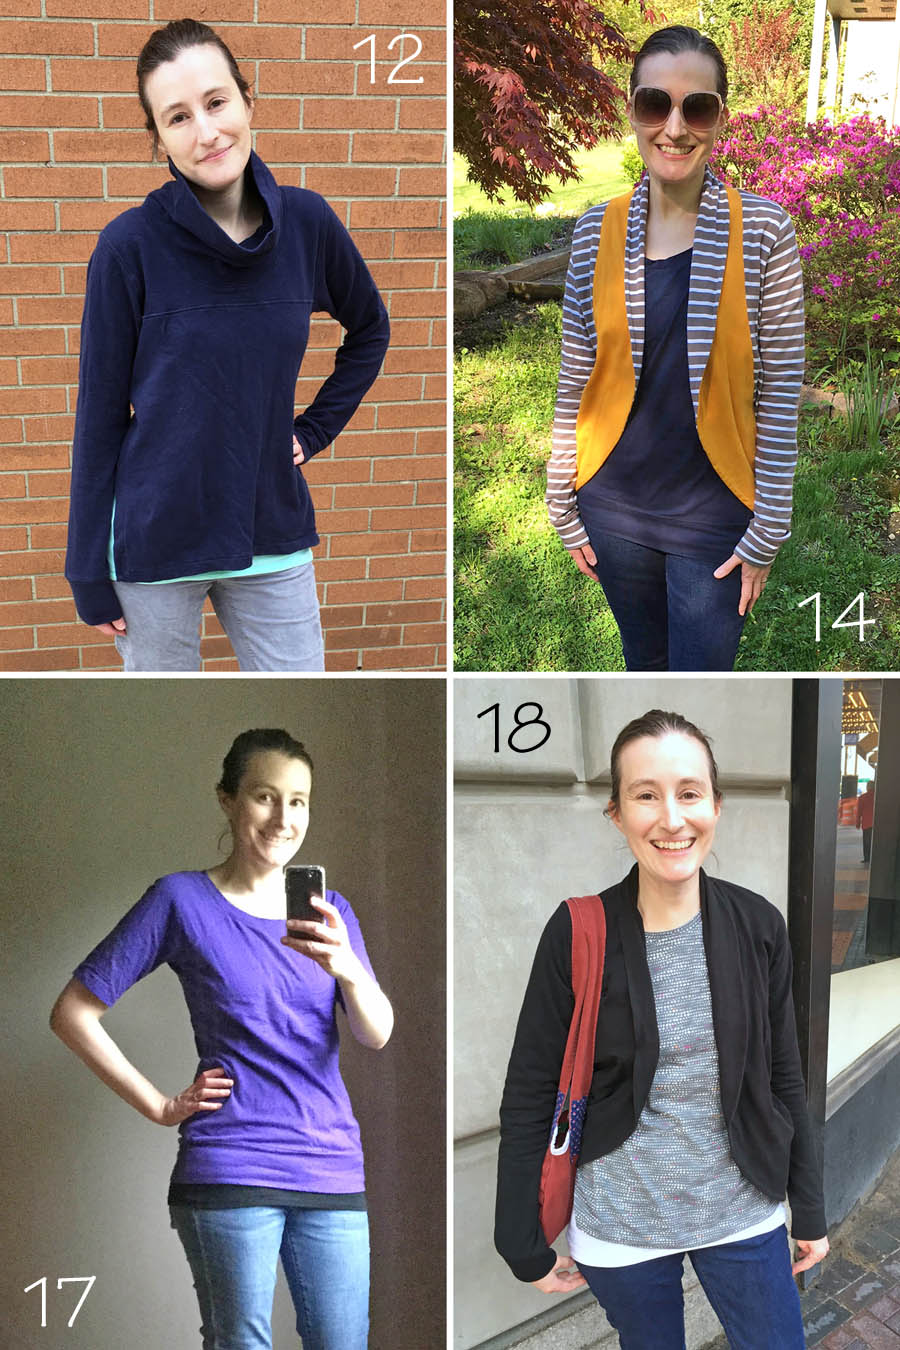
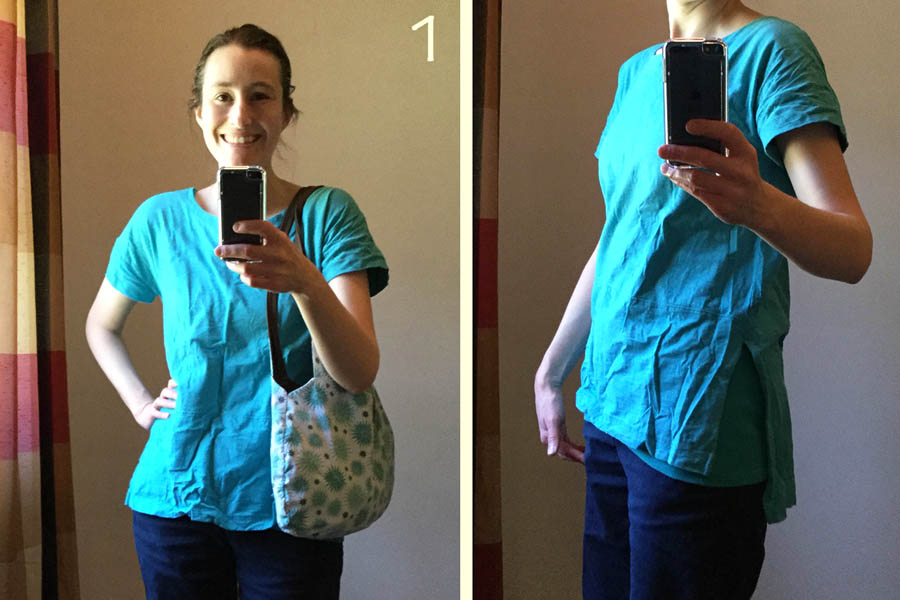
Hi folks! It is time for my Me Made May 2019 recap! If you follow me on Instagram you have seen some of the looks already, but this is the only place I am posting ALL of the outfits. As in past years I am grouping them by week and numbering them by DATE. Also as in past years, I only took photos on the days I was out and about in “real” clothes. Honestly I have TONS of lounge and pajama bottoms that I wear almost daily, so I was probably wearing something handmade most days, but I did not document those.
This May was a lot cooler than in past years! (No complaints there, I LOVE cooler weather, anything over 80 degrees Fahrenheit is too hot for me!) So you’ll be seeing lots of layers. Most of what I wore were older garments. I thought I was going to weave in some of my newest makes (including a brand new pair of cropped pants) but the warm enough days did not coincide with the opportunity to wear them. Since most of these makes are older, I will only be linking to my own fabric designs, since those are still available. I will link to all the patterns I used the FIRST time they are shown. So if you don’t see a link, scroll back up to the first time I mentioned the pattern. Also, I apologize in advance for the grainy selfies. We don’t have a great place to take photos inside our house and the ipod I used to take them doesn’t have the greatest resolution. Ok. Let’s dive in!
WEEK 1:
No documented outfits
WEEK 2:
May 5: Oslo Cardigan by Seamwork, Lane Raglan by Hey June Handmade, Infinity scarf featuring my Spines (Siesta) design printed on Cotton Spandex Jersey. The Lane and Oslo patterns, in my many variations, are both on heavy repeat this month. They are wardrobe staples… as are scarves!
May 7: Almost a repeat of May 5!!! Ha Ha. Oslo Cardigan, in fleece this time, Lane Raglan, Infinity Scarf featuring my SW Triangles Haze design printed on Modern Jersey, and thumbhole wrist warmers made from the same fabric as the Lane.
May 10: Another Lane! Another Infinity Scarf! But a different cardigan this time! This is the Blackwood Cardigan by Helen’s Closet.
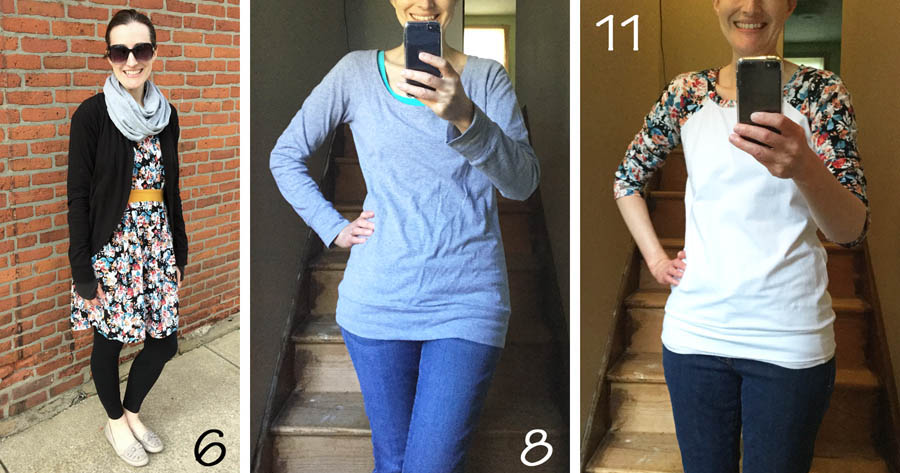
WEEK 3:
May 12: RTW inspired french terry pull-over that was a mash-up of the Halifax Hoodie by Hey June Handmade and the Tabor V-Neck (hem detail) by Sew House Seven with some custom detailing (like the yoke and top-stitching) to mimic the RTW look. I posted more photos of this make and more details in THIS post.
May 14: Julia Cardigan by Mouse House Creations and a Lane Raglan. This lane is made out of Robert Kaufman Laguna Knit, it is one of my absolute favorite CL. Lighter and drapier than most, but still a nice weight. A lot of my me-mades in this post were made from it (Including the May 10th Lane and the May 17th Lane). You can find it in a lot of online stores.
May 17: ANOTHER Lane Raglan (custom sleeve length).
May 18: Another Julia Cardigan, this time paired with a custom tee pattern I have been developing from the Renfrew Top by Sewaholic. It is my “fancy” tee version. Actually, since taking this photo, I have modified the neck finish one this one so it dips down more. Bag is also me-made.
WEEK 4:
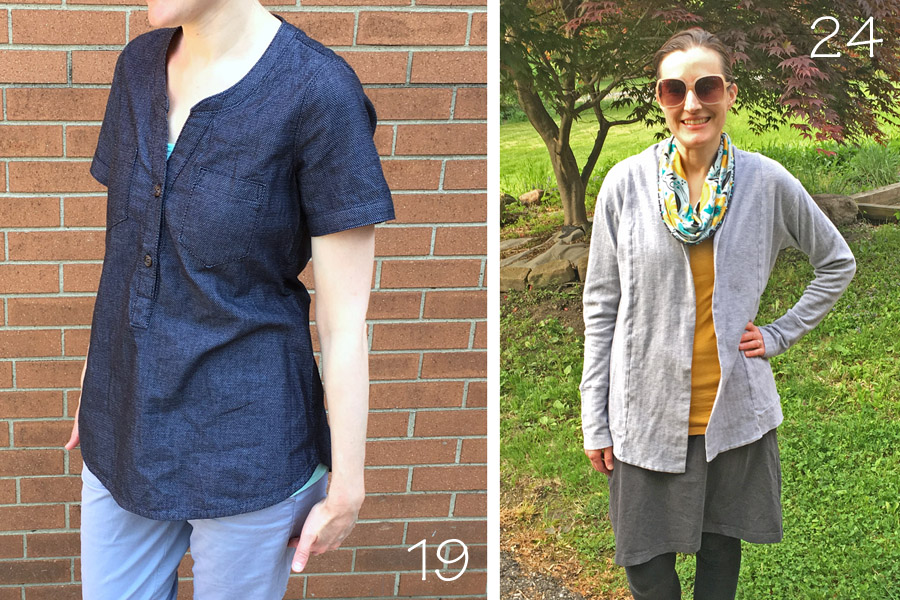
May 19: Chambray Cheyenne Tunic by Hey June Handmade with custom short sleeves. This was a newly “made over” garment and I was super excited to bring back into rotation. I shared about my modifications in THIS post. I was most likely wearing a handmade cardigan over top but I honestly can’t remember which one and I don’t have a photo with it.
May 24: Oslo Cardigan, Knit Skirt (self-drafted starting from a RTW skirt) and Infinity scarf featuring my Petal Potpourri (Bold) and Sprigs and Leaves (Bold) designs printed on Modern Jersey.
WEEK 5:
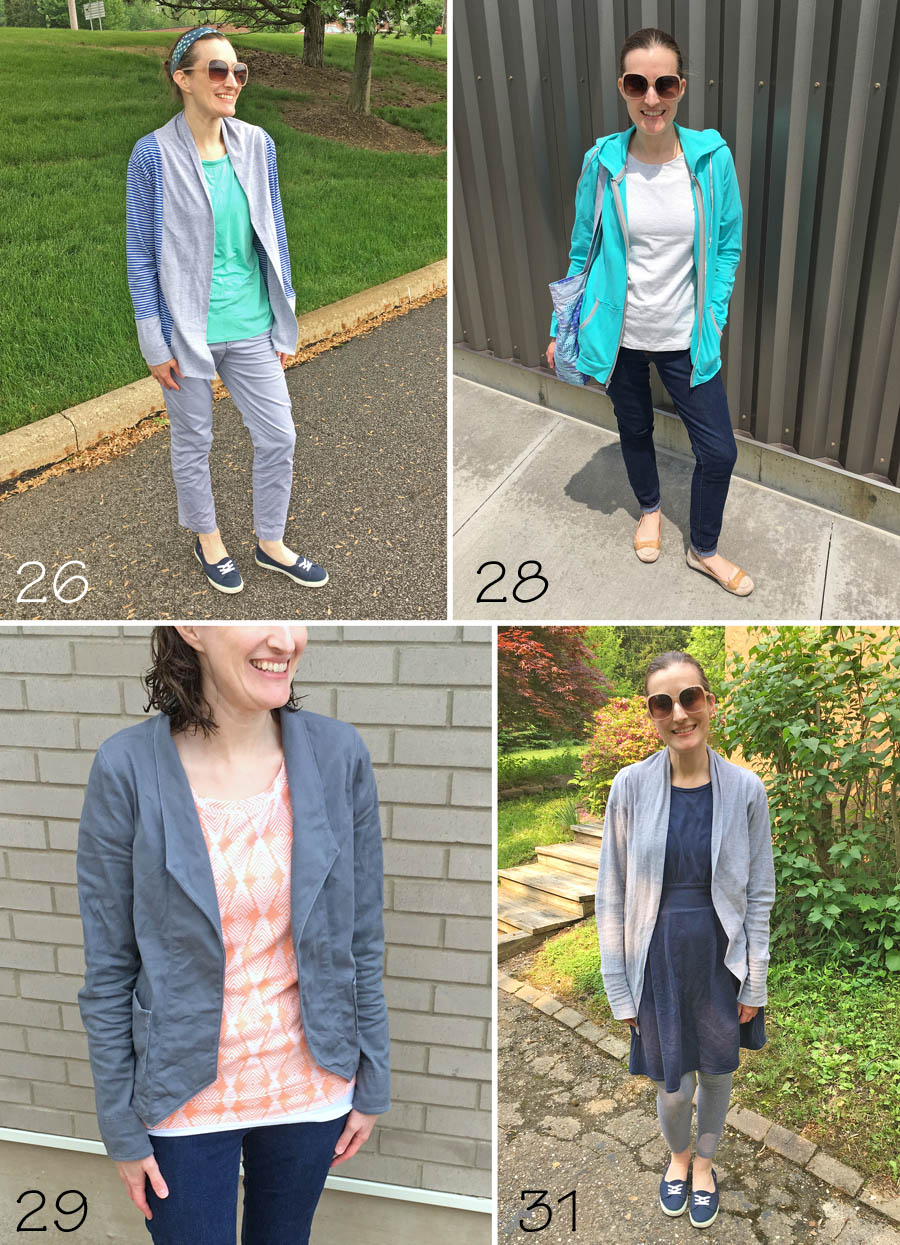
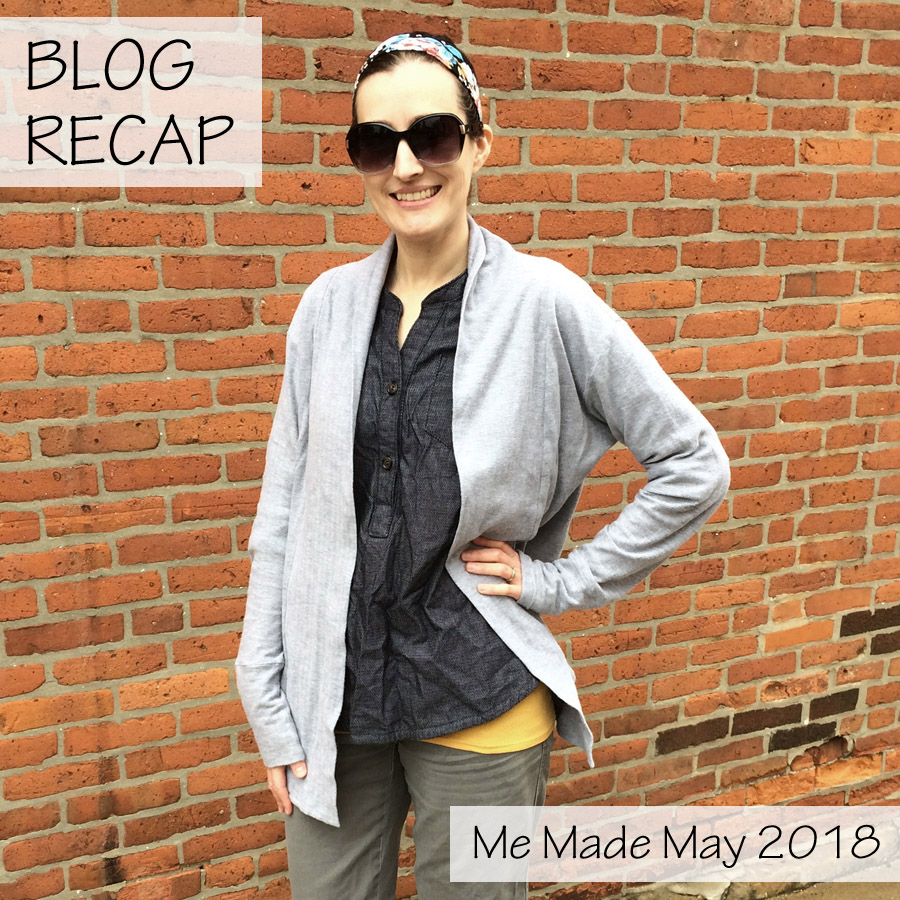
May 26: Another Oslo Cardigan over a brand new make, the Chai Tee by Liesl & Co. View of just the top is the first photo of this blog post so you can have a closer look. I shared the details in THIS post. Headband is also me-made.
May 28: Halifax Hoodie (An actual zip up hoodie version this time), Another version of my custom Renfrew hack fancy tee, and handmade tote. I call this one my cool tones geometrics tote, made with all my original pattern designs. You can see a close up look at it in THIS post and find the fabrics in this COLLECTION (a few have been modified in scale, color, etc before I listed them).
May 29:Morris Blazer (with quite a few mods) by Grainline Studio and a Renfrew Top by Sewaholic (This time MOSTLY per the pattern, I did eliminate the short sleeve bands, which you can’t see anyways). The blazer was made a while ago, I shared all the mods in THIS post.
May 31: Last Day! We actually took a road trip to IKEA that day and I was SUPER comfy in these #secretpajamas Oslo Cardigan (same one as on May 24) and my first ever Coastal Breeze Dress by Make it Perfect (also made in RK Laguna knit). I have since made 3 more of this dress. Another favorite pattern.
FINAL THOUGHTS:
Overall I would call Me Made May 2019 a success! Sure, I had a lot of pattern repeats, but I am ok with that. One of the things I love about sewing is getting to create garments that really work for me and my body. And when I like a garment, I make a lot of them! Especially since I often do a lot of mods to get them how I want them, might as well maximize that effort. And actually, I think it is quite fun to see all the variety and variations you can achieve with just ONE pattern! I am a bit disappointed that three brand new makes never made it into the mix. I was especially excited to show off the pants I made. And I expected to wear my newest Coastal Breeze dress (finished MONTHS ago) to a night out… but it only works with bare legs and it has not been bare leg weather (for me anyways). (In fact 2 of those 3 makes are still unworn!) But as I said at the beginning, I LOVE this cooler spring we have been having, and I will get to show off those makes eventually!
I hope you enjoyed this recap! If you have any specific questions about fit/modifications that I did not share or link. Want to know about a fabric I used. Or would simply like to share a comment I would love to hear from you!
Happy June Everyone! It is that time of year again… Me Made May Recap Time that is! Did you participate? My “pledge” this year was basically the same as last year. I wore and documented Me-Mades for everyday I left the house. I actually probably wore me-mades almost everyday since I have a lot of lounge wear and pajama bottoms that are handmade. They are, in fact, some of my favorites in those “genres”!
My post will follow a similar format to last year. I will group my outfits by week (Sun-Sat for full 7 day weeks), note all the patterns and share any thoughts I might have. They are numbered by DATE. I won’t include much in the way of sewing details, but if you have any questions about sizing, alterations, etc. please ask in the comments! I rarely make a pattern exactly as drafted so expect that the majority of these had some sort of tweak. I am only going to link patterns once, so if you see a pattern you like without a link scroll until you find one from another week!
WEEK 1:
May 1: Bento Tee (Heavily Hacked) by Liesel + Co., Not-so-Knotted Tote (Made with my own fabric design, Geometric Cactus Flowers. ) I made my sister a very similar bag using the same fabric which you can read more about in this post.
Thoughts: This was a typical week for me, with the month starting on a Monday, I only had one day out of the house (until Sunday which started week 2). Knowing that I would be going out on the first day of May was exciting since I would kick off the month with an outfit… but I was not feeling well that day which majorly deflated that excitement. But I pulled a (very wrinkled) look together (paired with RTW blazer). This Bento actually has some fun details added (Like the deep side slit in the second photo) but I have never managed to get great photos of it. (I will have to try again). This was also my first attempt at selfies with my new mirror… hadn’t quite found the right place to position it yet.
Thoughts: It was cooler weather this week (no complaints) so more fall/winter outfits than spring. I think it is amusing looking back that I wore two items that used the same floral fabric. Two lanes too! (But it is one of my most made patterns so that is not surprising).
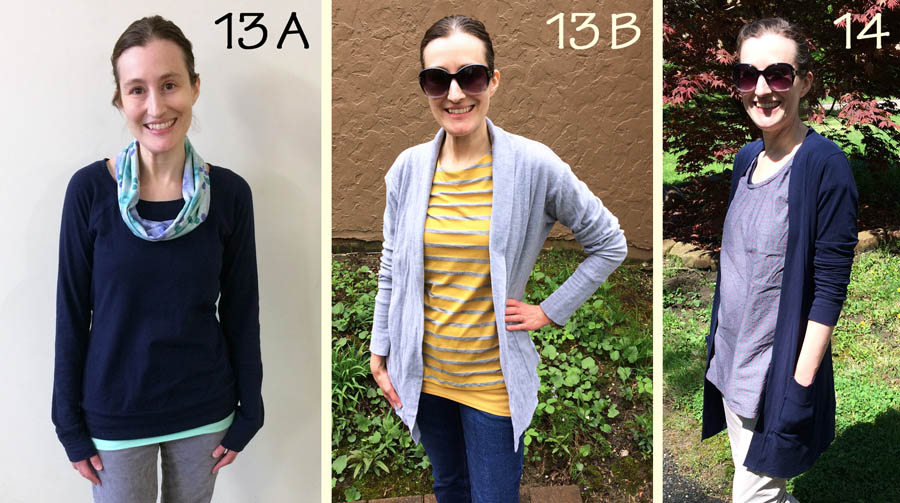
WEEK 3:
May 13 (A): Lane Raglan, Self-Drafted Mini Cowl (featuring my own fabric designs from the KIKU GARDEN Collection).
May 13 (B): Oslo Cardigan, “Taormina Tee” (Drafted from the Renfrew Top, but majorly changed).
Thoughts: This week featured two “special events”: Mother’s Day Lunch (Hence the second May 13 Outfit, the first I wore to Church earlier in the day) and my husband’s birthday. He took the day off and we went out for lunch at a favorite french restaurant, so I was able to get a mid-week “non-selfie” photo!
WEEK 4:
May 20: Cheyenne Tunic by Hey June Handmade and Oslo Cardigan (See photo at top of the blog post)
May 26: Hadley top by Grainline Studio, Not-so-Knotted Tote
Thoughts: It was actually too cold for the outfit I wore on May 22, but I REALLY wanted to have at least one pair of me-made pants make it into a photo! Ha ha! Anyone else dress for the photo instead of the weather/activity/etc. ?
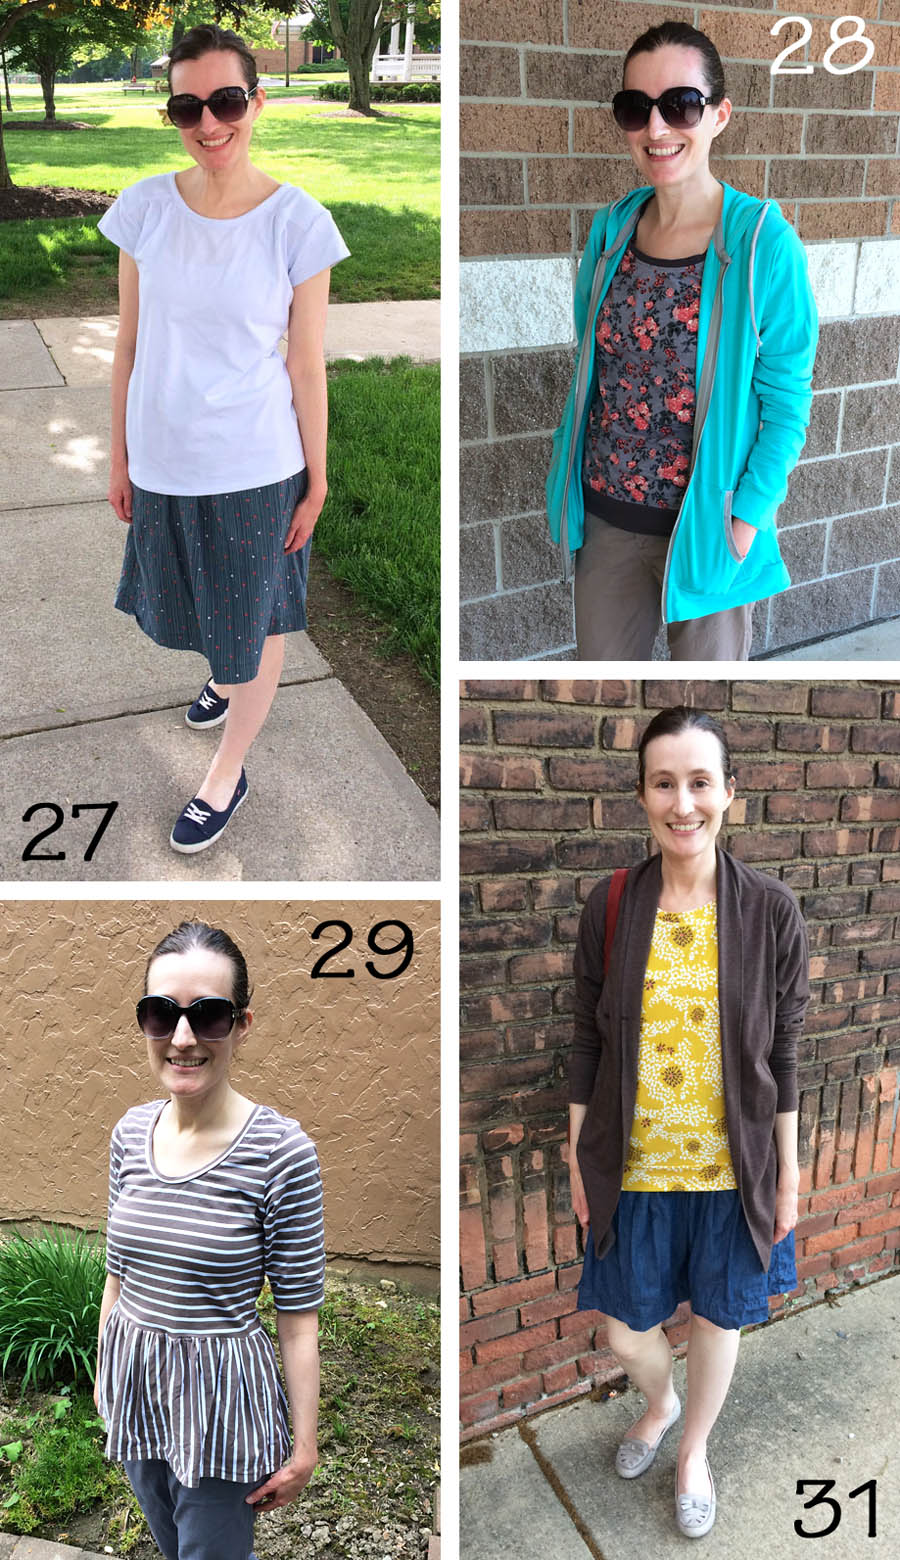
WEEK 5:
May 27: Chai Tee, Everyday Skirt both by Liesel + Co. I also wore a me-made cardigan (not pictured), either the gray Oslo or the navy Blackwood again… (Can’t remember for sure). I chose not to take a photo with it since the tee was new and I wanted to document it.
Thoughts: My husband was off this week for a “stay-cation” so there was a lot more out of the house activity than usual! It also got very hot so I was able to wear more of my warmer weather items.
FINAL THOUGHTS:
Overall Me Made May was fun. I love seeing what everyone else is wearing (especially how they style their me-mades). I love my handmade wardrobe and wearing my me-mades all the time already so I don’t really need the motivation. And actually it can be a bit tiring taking all the photos. Plus I feel more pressure to curate my outfits rather than just grab whatever I feel like wearing. But I am happy I did it! It challenged me to style and wear some things I might not have naturally grabbed. I obviously love my Lane Raglans… in fact I have already made another one, in solid purple, since I don’t have a lot of solid short-sleeve me-mades. I also wore my Oslos a lot, but that is no surprise, I am all about layers!
And that’s a wrap! I may or my not choose to participate next year…. or more likely I will participate but might not worry so much about pictures!
Thanks for reading! And again, if you have any questions or just want to say hi! Please leave a comment!
SPECIAL NOTE: Sprout Patterns which is discused in detail in this post is no longer open. I have decided to keep all the Sprout content as part of this post. Unfortunately you will not be able to purchase the product I used. You CAN still get the Lark Tee Pattern from Grainline Studio.
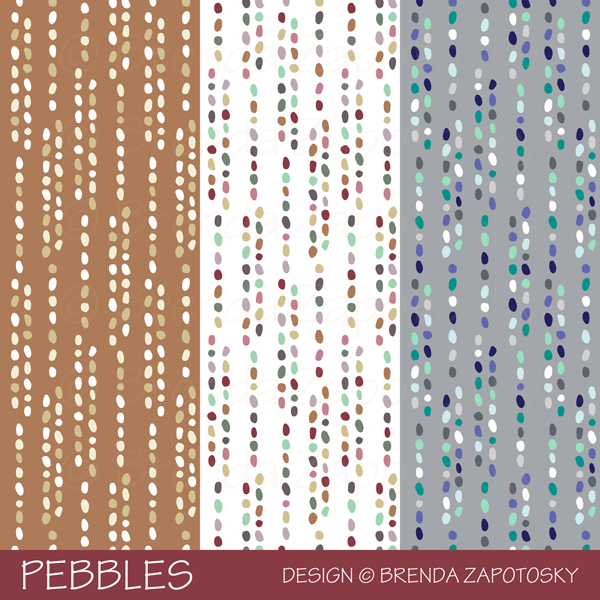
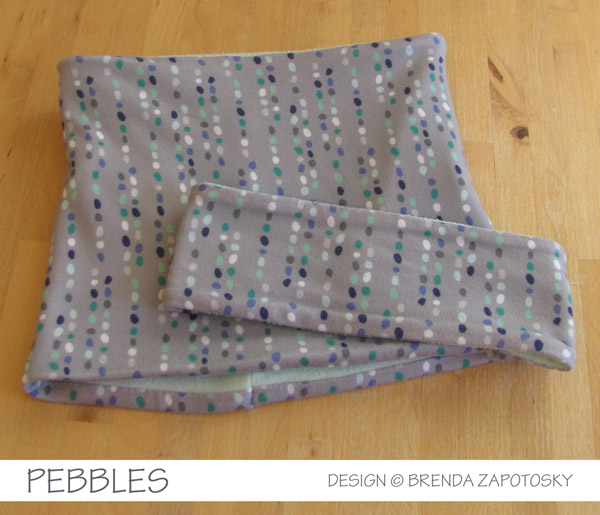
It is time for another installment of “Sewing and Design Meet”. This time I am sharing all about my Pebbles design and what I have made with it. The majority of this post will be focused on the Lark Tee I sewed via a cut-and-sew project I ordered through Spoonflower’s sister site, Sprout Patterns, and I will be speaking a bit about that experience too. At the end I’ll share a quick look at a simple winter accessories set I also made. This post is LONG. If you don’t care about sewing details you can read about the design and then just scroll and look at all the photos 🙂
DESIGN:
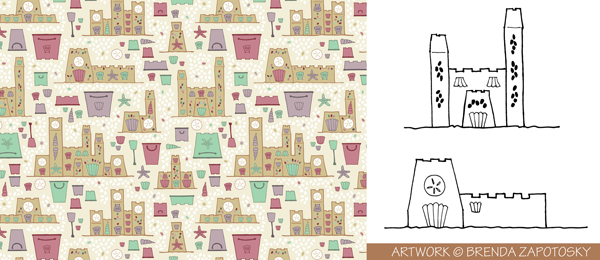
Pebbles is a coordinate I created to go with my Sandcastles design as part of my Beach Bliss Collection. I originally offered this print in 2 different colorways and then added a third one which does not actually color coordinate with the collection because I specifically created it for the winter accessories project.
The Sandcastles design was created from hand drawings that I vectorized and turned into a pattern in Illustrator. I included pebble details on the sandcastles and as background infill. To create the Pebbles print I pulled out pebbles from the pattern and arranged them into vertical lines. Below is a look at Sandcastles and some of the original hand drawings. Most often, even if I do a hand drawing first, I completely redraw them in Illustrator, but this time I used auto trace since I wanted to maintain the feel of the hand drawing which I think matches the beach theme well.
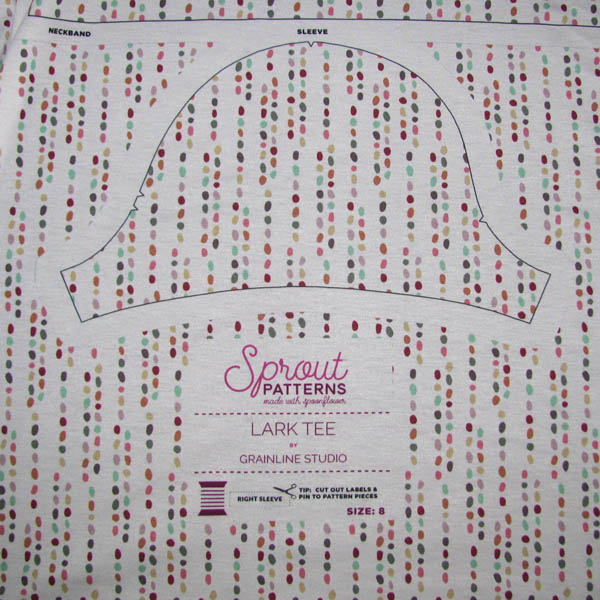
Instead of purchasing “raw” fabric for this project I ordered my fabric AND pattern through Sprout Patterns. If you are not familiar with Sprout they are one of Spoonflower’s sister companies. With Sprout, you can order sewing patterns from a wide range of companies and designers printed directly on the fabric! It is the ultimate, cut-and-sew: all you need to do is cut around the outlines of the pieces and start sewing! With your Sprout purchase you also get a pdf copy of the pattern so you can sew it again in the future and also use the pieces for adjustments, etc. (Which I definitely did). I chose the Multicolored version of my Pebbles design printed on Modern Jersey. Here is a look at a portion of the printed fabric where you can see a pattern piece and how the design continues on the unused fabric:
There are some pro’s and con’s to using Sprout and I think ultimately it will vary person to person on whether this sort of sewing experience is right for you.
PROS:
This is definitely a time saver. Not only does it save you the time of printing and assembling a pdf or cutting out a paper pattern, but it saves on the time it takes to cut fabric too since all the arranging of the pieces on the fabric and lining up the grainlines etc. is already done for you.
You can order exactly the amount of fabric you need! Instead of having to over buy on yardage numbers, the cut of fabric you get from Sprout will give you the fractional yards without having to buy a full 2 yards for example for a 1.5 yard project. You can also mix and match fabric designs within a project… so if you want all your trim pieces to be a different fabric, you can select a different fabric design or even a solid color for those pieces.
Even though the fabric is sized to fit the pattern, for many projects there will still be some unused spaces leftover. Sprout prints the fabric design on these areas too (as you can see in the photo) so you might end up with some bonus fabric pieces you can use for something else. (I did end up NEEDING some of my extra, which you will read about below).
CON:
You can only choose to have one size printed… they do not grade between sizes. If you are a “straight out of the package” size this is probably not even a con. I am most definitely NOT a single size gal and this is a big issue for me. I found a way to work around this and grade a bit between sizes which I will discuss in the sewing section of this post.
One last detail that is VERY important to note is that you MUST follow washing instructions. I learned this the hard way as I shrunk my fabric, which changed the size and proportion of the pattern pieces! I am so used to pre-washing my fabric in a blast of hot water and hot dryer to get the fabric to shrink as much as possible before I sew with it, I was basically on auto-pilot and did the same with this project. BAD IDEA. I was able to make it work, thankfully, but my shirt is a bit shorter as a result. AND I had to cut new sleeves. Thankfully they were the cap style and needed very little fabric and were able to fit on unused portions of the fabric but it is a bummer that I had to do that instead of saving those sections for a future project.
SEWING:
The Lark Tee is a basic tee shirt with a ton of options. For my Sprout project I chose the scoop neck with cap sleeves (but as I mentioned above you get the pdf so you get ALL the views and variations with it and can print it and use it like a regular pattern. I have already made several other versions). I chose Modern Jersey as the fabric option. The sewing is very straightforward so I won’t really go into that, but I do want to talk a little bit about grading the pattern.
I am pear shaped and in this pattern (and pretty much all Grainline top patterns per the SIZE CHART) I am a size 4 bust and my hips sort of hover between size 8 and 10. But with Sprout you can only pick 1 size, so I had to do some creative thinking. I have square shoulders and a wide upper back so I usually like to go up a size (to a 6) for my bust. And since this was a stretchy tee, I figured I would be safe going with the size 8 for my hips. So I ordered a size 8 with plans of using the pdf pattern pieces to grade the top smaller. Of course needing to print and assemble ALL the tee pieces pretty much negated the fast and quick factor of Sprout, but I really wanted to try the whole process once to see how it worked, AND it was still faster having the pieces already outlined on the fabric since it saved me from laying them all out and finding the grain, etc.
As I mentioned above, I unknowingly shrunk my pieces, so when I laid the pattern pieces on the printed fabric things did NOT line up like I expected. The fabric shrunk WAY MORE vertically then it did horizontally… so they weren’t smaller everywhere, more like squashed. In the end it was almost good that I was grading it smaller, because I was able to fix this with my adjustments. It did mean however, that the top got shorter. AND, the size 6 sleeve piece did not fit within the outline. Thankfully, there was enough extra fabric elsewhere to trace the sleeves. After that was all worked out the sewing was easy! Especially since I sewed it twice with other fabrics prior to cutting into the good stuff.
Overall I am very happy with the fit of this tee. I LOVE the size of the scoop neck! It is basically my “dream scoop”. The sleeves are maybe a tad snug for cap sleeves and I would like the tee to be an inch longer (but that was the fault of the shrinkage). I absolutely LOVE the Pebbles design as a tee, but the white background version might not have been the wisest choice. (Thankfully I ALWAYS wear a tank top under everything). I also do not love it in Modern Jersey and wish I would have chosen the Cotton Spandex instead. I have sewn a TON of things with Modern Jersey, I love the fabric, but for a tee shirt… it is just not breathable enough for my tastes. But this is totally personal preference. I am a natural fibers gal.
*** You might have noticed a pants change in these photos… I actually took photos on multiple occassions (months apart!) and locations. I actually finished this top last year! The blog post was so delayed I had a chance to take another round!
As stated at the start of this blog post, Sprout Patterns is no longer open. You can still make your own! You can buy the Lark Tee Pattern from Grainline Studio directly. It is also available as a paper pattern. And the Pebbles design on Spoonflower seperately.
PROJECT #2: Neck and Ear Warmer Matching Set
Technically this Project #1 since I made this well before the tee shirt but the blog post flows better to have it at the end. Using the Drizzle colorway of the Pebbles design, printed again on Modern Jersey, I made a matching fleece-backed ear and neck warm set. Both of these are self-drafted. I love the fit of the ear warmer but I think I would tweak the neck warmer proportions should I make it again. And I would not use the Modern Jersey again. While I do love it for infinity scarfs, in this application where I backed it with fleece, a fabric with more structure like cotton spandex works better. I have made several ear warmers and the ones that used cotton spandex are much smoother against the fleece.
That’s it! You made it to the end! Woop! I actually have made one other item with some of Sprout leftovers, a headband, but I don’t have a good photo to share. (And still have pieces left I could use as accents on a future project too!) I think I covered everything, but feel free to ask any questions or just say hello in the comments.
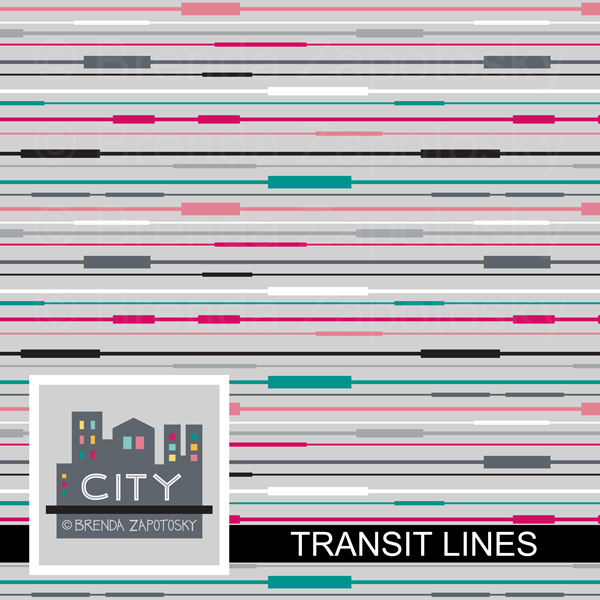
It is time for another edition of Sewing and Design Meet! This time I am sharing about my Transit Lines design and the tote bag I made with it. This design is part of the City Collection which can be found in my Spoonflower shop.
DESIGN:
When putting together a new collection I don’t often sit down and sketch out ideas for coordinates but for CITY I actually did. My original idea for the Transit Lines design was to have criss-crossing lines going in many directions, similar to a subway map. However, as I started drawing it in Illustrator I really loved the look of just the horizontal lines with the thickened bars and decided to take it in that direction instead. I love how the pattern is a versatile stripe and yet, when paired with its title, can easily (I think) invoke images of the city site that inspired it. Whether you interpret the thick bars as trains or stations is up to you! I also really love the color palette I decided on for this print: mostly neutral but with pops of color.
FABRIC:
A few years ago Spoonflower had an awesome and rare 50% off sale on Eco Canvas and I ordered a couple of yards. One yard I divided into (2) 1/2 yard pieces with the intention to make a tote bag with each of them, although at the time I did not have a specific pattern picked out. I ended up choosing free tote patterns from Purl Soho for both of the totes. I have a previous blog post about the first one I made, the Railroad Tote, and some zipper pouches I made with the extras. I chose the Everyday Tote for the Transit lines design as I thought the more horizontal shape would suit it well.
The Eco Canvas has pluses and minuses for me personally. On the plus side: It washes and sews well and colors are bright and vibran. On the minus side: It is much softer and drapier than other canvases which is something I do not like. But I think this is really just a personal preference. I gave the Railroad Tote to my mom and she loves that soft quality. When making the zipper pouches I decided to interface the Eco Canvas portions and I was much happier with the structure. So for the Everyday Tote I knew I wanted to interface those pieces. I needed to do some construction changes to accommodate this (Along with a bunch of other construction changes) which I detail below.
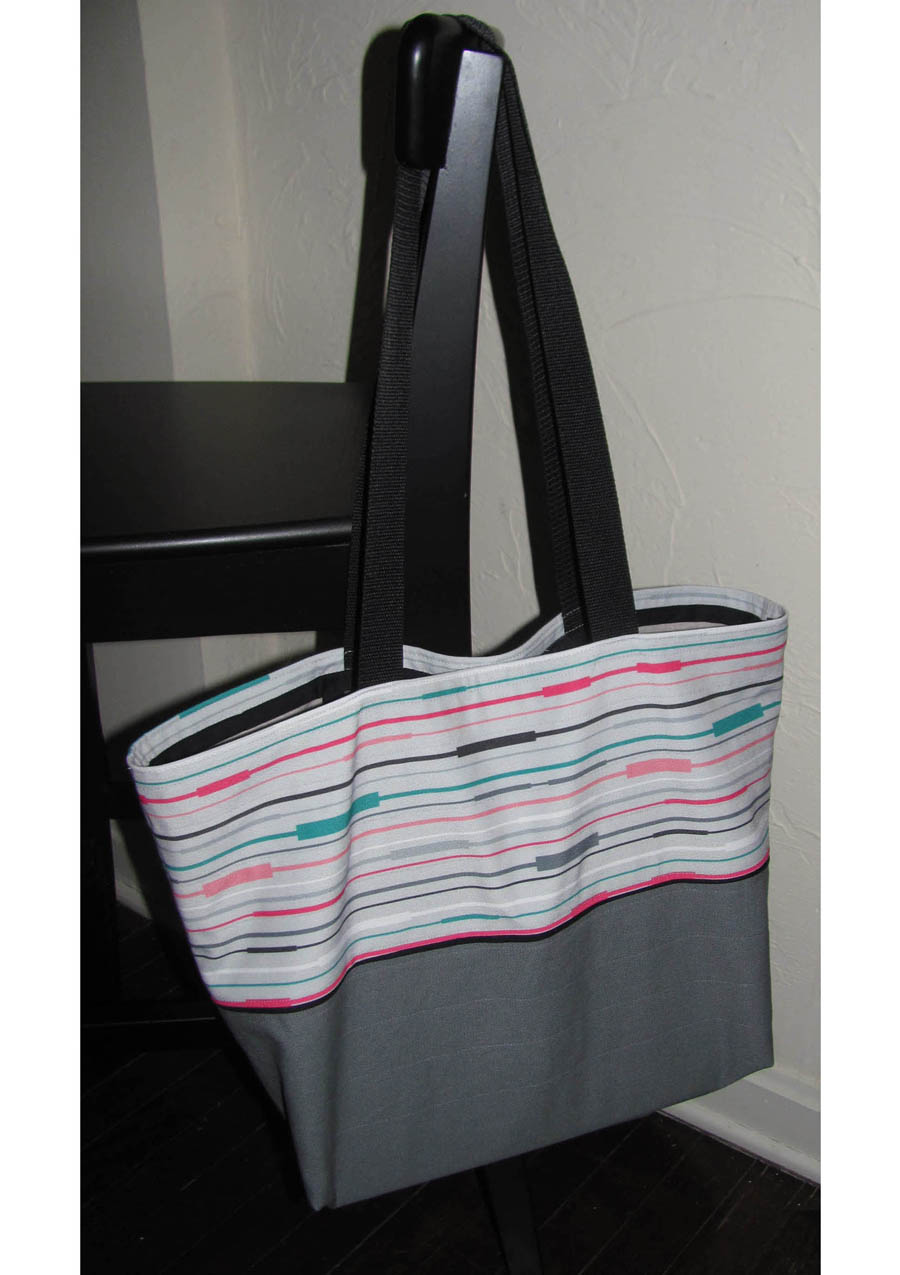
SEWING:
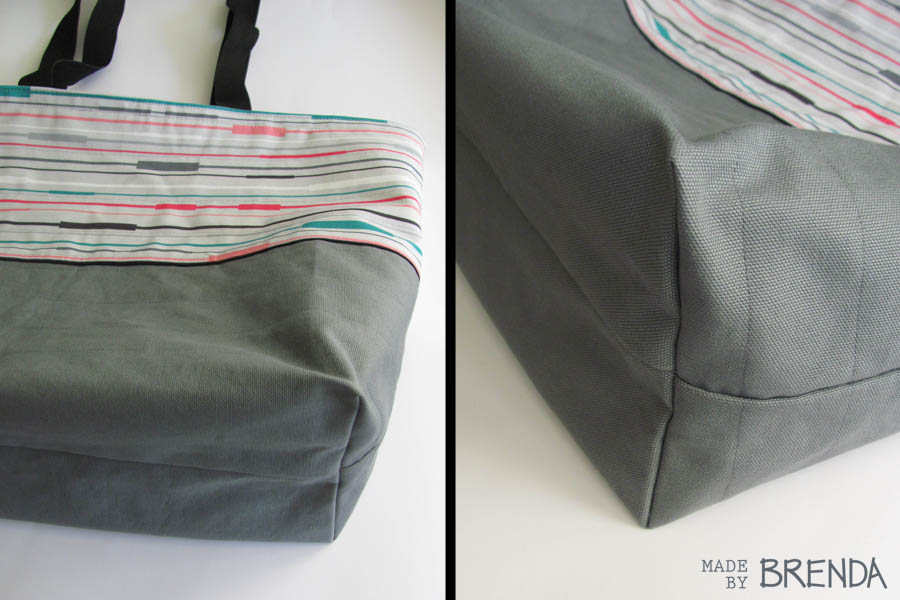
There were a lot of steps to making this bag, including some extra ones that came along with my changes, but otherwise it was straight forward and easy to sew. I didn’t take a lot of in-progress photos (my sewing space is not photo friendly) and it was difficult to get a good overall look of the bag. Here is the best one:
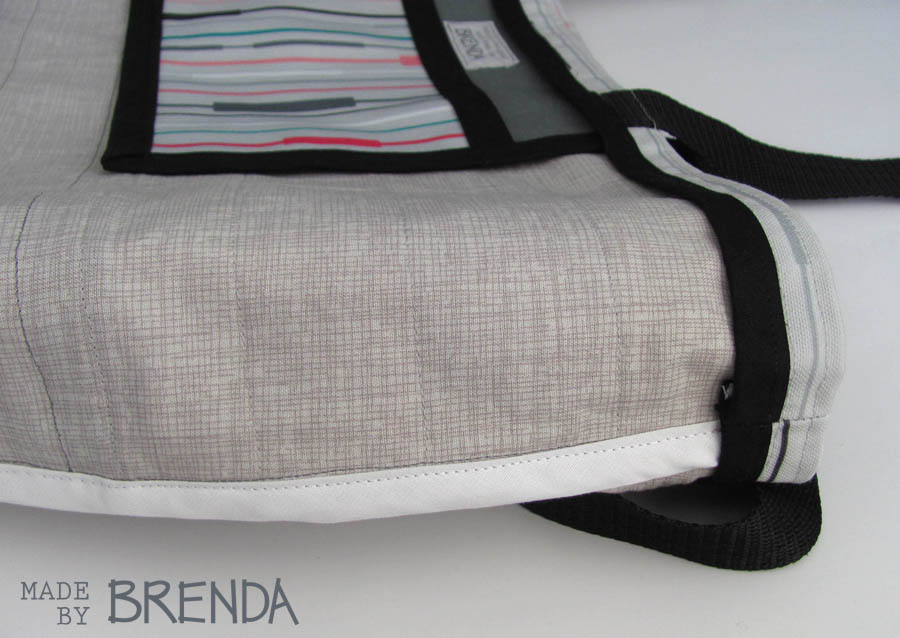
As mentioned above, I made several construction changes when sewing up this bag. I knew I wanted to interface the Eco Canvas pieces and since the bag isn’t lined, I needed to underline at least those portions so that the interfacing was not exposed. After contemplating solutions for this, I decided to also change how the bag panels were sewn. Per the instructions, you cut two full side pieces from what eventually becomes the “upper” fabric, and then cut bottom panels of the “lower” fabric which go over top the first fabric on just the bottom portion. There are some good reasons to sew the bag this way. It ensures you aren’t relying on a horizontal seam to hold the top and bottom half of the bag together and it creates a nice double layer for the bag base. But, it meant that 1/2 of my good patterned fabric was going to be covered which I wasn’t crazy about. So, I decided to instead cut both pieces at half height and let the seam where the bias “piping” detail is connect them together. Since the bag side pieces were already cut, I chose to cut one in half height wise and that determined the height of my bag (and preserved a nice FQ sized piece of the Transit Lines for a future project!). I sewed the top and bottom halves together with the accent bias “piping” in between. I then UNDERLINED the entire height of the bag sides with a coordinating quilting cotton that I had leftover from the previous Eco Canvas projects. I quilted this to the bag panels which helped provide the extra stability I lost when I changed the construction. The quilting, despite using a walking foot AND having design lines to follow, is kind of wonky… Quilting is not my forte! Despite the lackluster quilting, I absolutely love the end result inside the bag. I think the quilted underlining really gives the bag a high quality look!
Other changes I made:
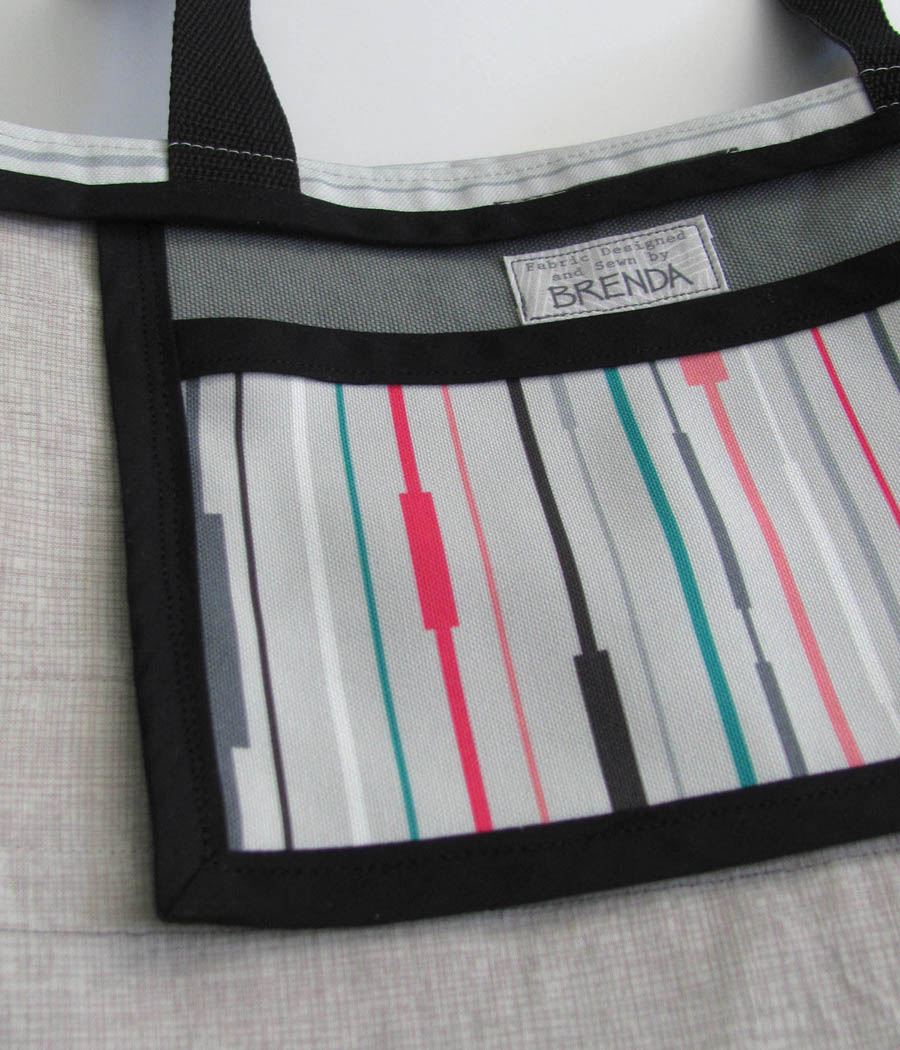
I flip flopped from the directions which fabric I used for the front and back of the pocket so that I could enjoy more of the print. I also made the pocket wider since there was plenty of room to do so.
I changed the order of sewing so that the folded over top hem of the bag was sewn last. I did this on my Railroad Tote too. By saving it until last the tops of the side seams are concealed instead of exposed.
Longer straps. I like to wear my bag over my shoulder and longer straps make it more comfortable when I do.
I chose to use 2 different colors of bias tape instead of one and I am very happy with the results. On areas where I wanted the trim and finishing to stand out (like on the exterior seam or around the top of the tote fold over hem) I used black. To finish all the interior seams I used white.
DETAILS! Pretty details are one of the “perks” of sewing your own! Like rotating the print to be vertical on the pocket.
The webbing I used for the straps (linked at the end) is a bit industrial. It works ok… especially since the Eco Canvas is also a synthetic, but I wouldn’t get it again. I purchased a large roll of it and have a lot leftover, so it will probably pop up in another project at some point. It was a really good deal though, and should be pretty durable (I hope).
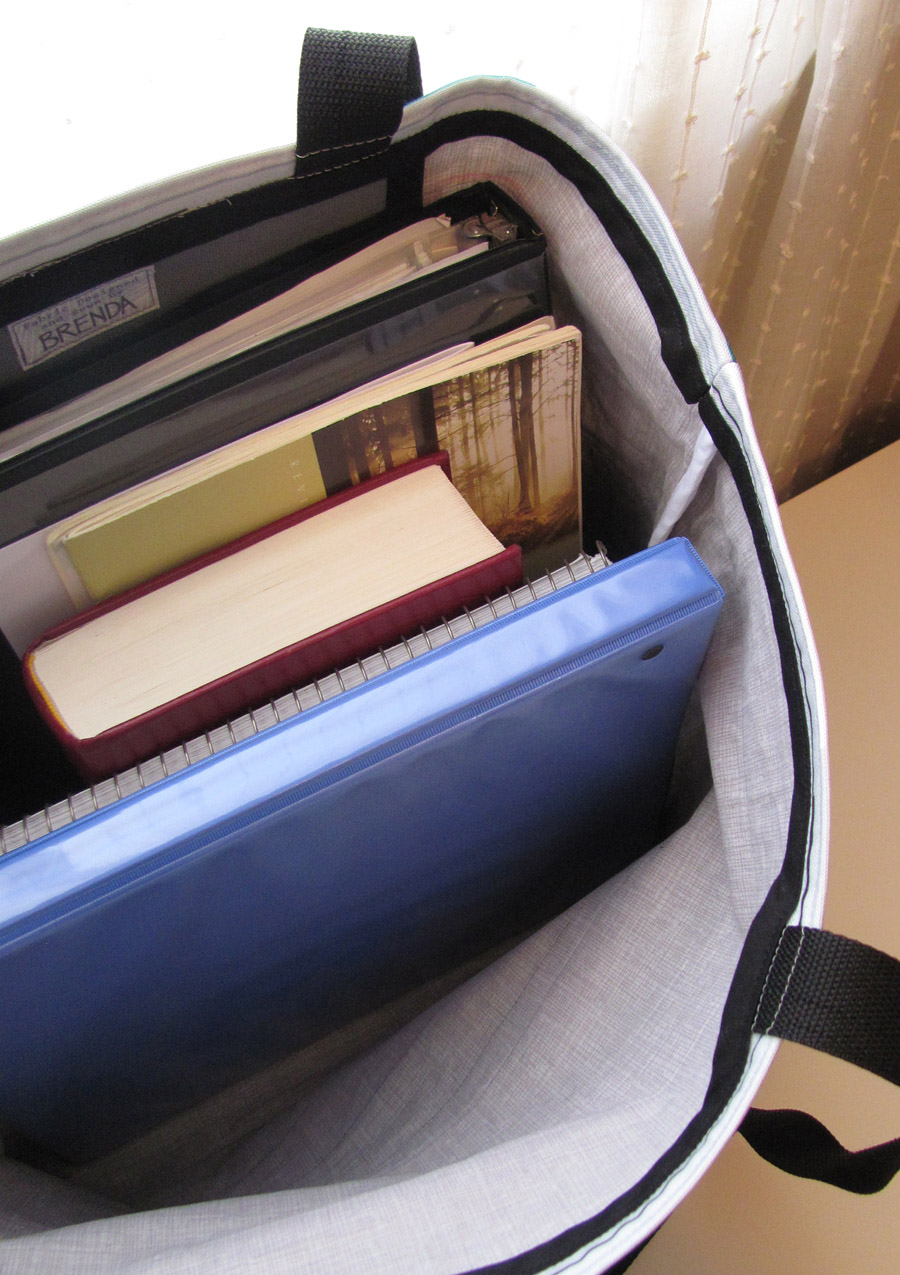
I was hoping that this bag would work as my music bag and I am happy to report that it works perfectly! My previous bag was a freebie tote that I got when I worked in Architecture. It was rather ugly and advertised a window company that I am not even a big fan of (otherwise I might have posted a “before” photo). I love having my new “chic” bag that is me-made and features one of my own designs! It holds all my music, books, and misc. with room to spare! (And even packed can sling over my shoulder!)
DETAILS SUMMARY:
(I have seen others do a summary like this and think it is a fun way to provide quick access info all in one place. I will probably make it a regular feature of my sewing posts.)